First Setup: Customer with Microsoft 365
Introduction
This implementation guide covers the first setup of MailStore Cloud for customers that are using Microsoft Entra / Microsoft 365 as their directory service and mail system. The guide includes many links to help pages that provide more detailed information about various topics.
It is assumed that you received your registration information including username, password and the login URL via mail. If you did not receive this information, please contact the MailStore support.
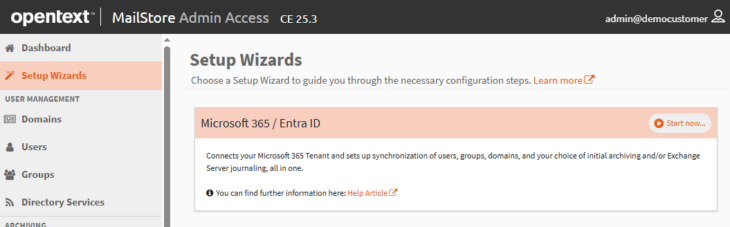
![]() MailStore Cloud also offers Setup Wizards, which you can find under the “Setup Wizards” item in the side menu. Choose the Microsoft 365 / Entra ID Wizard from the avalable entries, which guides you through this whole process interactively, and creates configurations and schedules as well as the journal mailbox and endpoint for you automatically.
MailStore Cloud also offers Setup Wizards, which you can find under the “Setup Wizards” item in the side menu. Choose the Microsoft 365 / Entra ID Wizard from the avalable entries, which guides you through this whole process interactively, and creates configurations and schedules as well as the journal mailbox and endpoint for you automatically.
Login
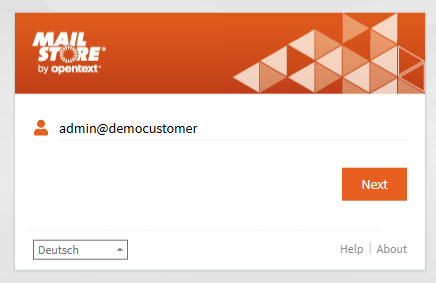
As a first step, please use the credentials that were provided to you to login to the administrative web access (short “Admin Access”). Please make sure that the URL ends on “/adminaccess”. You will notice that your username looks like a mail address, consisting of a name and a domain. The domain is used to identify you as a customer within MailStore Cloud. It cannot be used outside of MailStore Cloud, i.e. you cannot send mails to it or use the domain in your browser. In the screenshot below, you can see the username for a customer with customer name “democustomer”.
Admin Access at a Glance
After you have successfully logged in, you will see the dashboard of the Admin Access. It presents you with basic information about your tenant and points out inconsistencies in your configuration. You should check the dashboard from time to time to make sure everything is working smoothly.
The main menu of the Admin Access on the left provides access to both configurations and the process log. During this first setup, only a few of the sections of the Admin Access will be needed.
Setting up Microsoft Entra
Start creating a Directory Service Configuration in MailStore Cloud
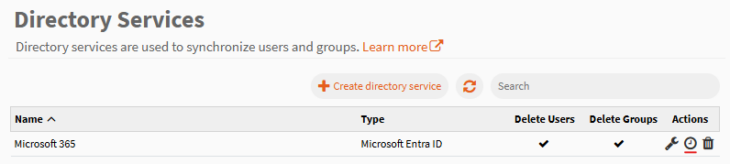
- In the Admin Access, navigate to Directory Service.
- Select Add directory service.
- Enter a name in the required Name text box.
- Select “Microsoft Entra ID” as type.
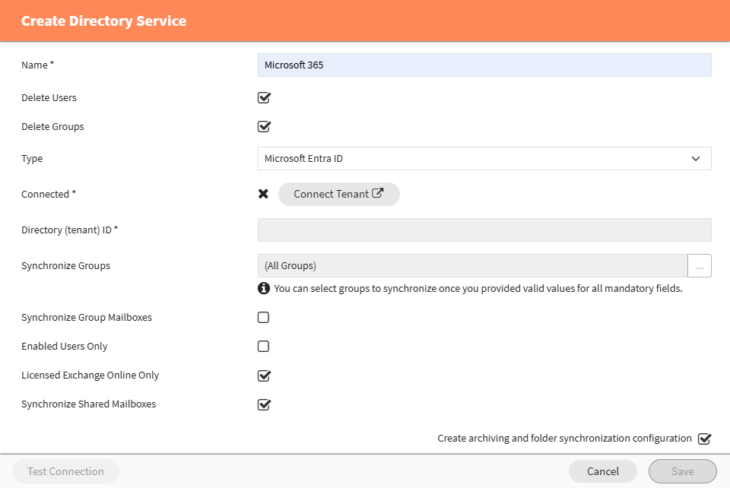
- Click the Connect Tenant button
- This will redirect you to Microsoft 365 portal in a new tab, where you are first requred to log in. Please log in with an account that’s an admin in your tenant.
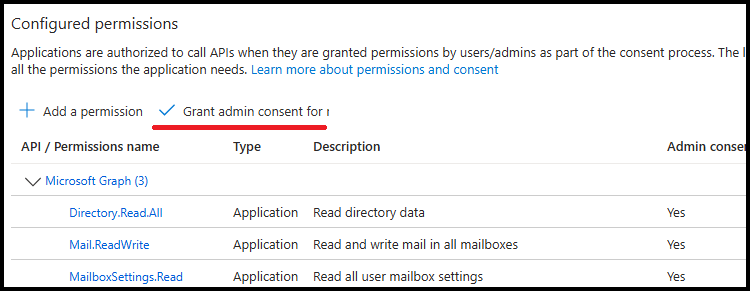
- You will then be prompted to grant admin consent to the MailStore Cloud app. The consent dialog shows you which permissions the app requires in order to synchronize your tenant to your MailStore Cloud archive.
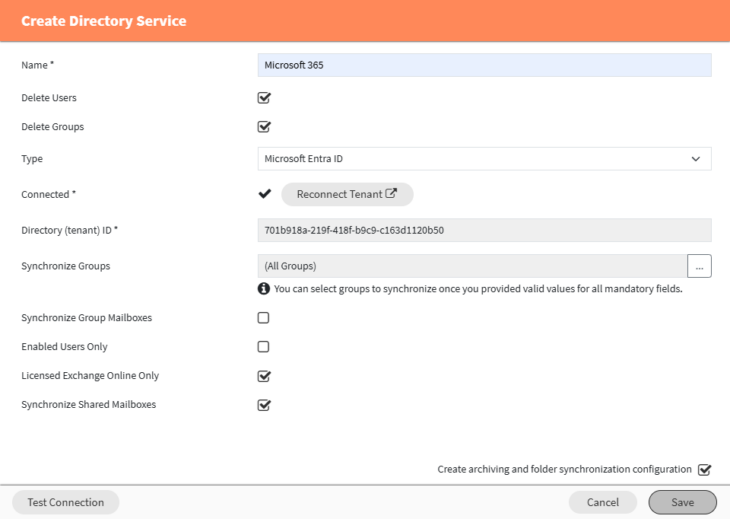
- Upon completion, the create dialog will update with the received tenant id so you can validate having selected the correct tenant.
- You can choose additional constraints to your tenant synchronization, which are further explained in the Directory Services Help Article.
You have now successfully connected your tenant and can continue with the configuration in MailStore Admin Access.
Create a Schedule to run the Directory Service Synchronization
To create a Schedule to run the Directory Service Synchronization:
- In the Directory Services tab, select the clock icon under Actions on the previously created directory service configuration.
- Select the recurrence for the schedule. Note: the directory service synchronization should be executed periodically.
- Save the configuration.
- The schedule should now be executed at your selected timeframe. A log for the execution can be found in the Process Log tab in Compliance.
The directory service synchronization will synchronize the following data:- Domains
- Mailboxes
- Users
- Groups
Synchronized domains can be found under the Domains tab in User Management.
Configure a group to grant access to Web Access
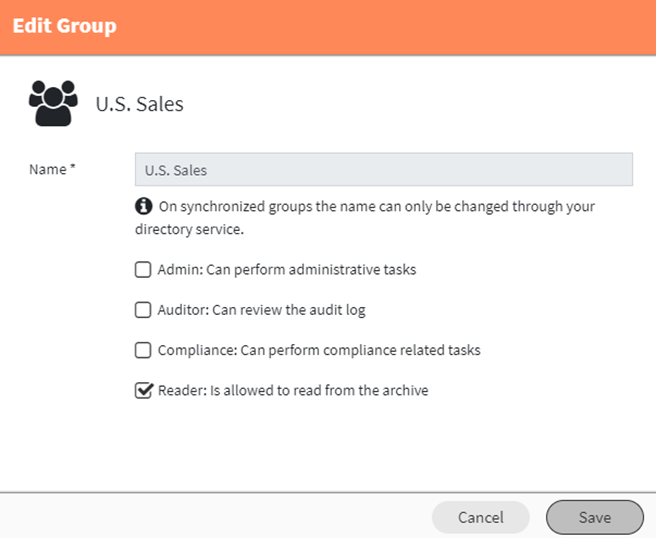
To enable the users to have access to their archive you need to add the Reader role to the user through a group permission.
To configure a group to grant access:
- Navigate to the Groups tab in User Management.
- Select a group containing all users who need access to Web Access. If this has not been created yet, create a new group and add those users.
- Edit the group’s permissions by selecting the wrench icon.

- Select the Reader role and click Save.
After adding the “Reader” role it should be possible for the synchronized users to log in to Web Access.
Adding the “Admin” role to a synchronized user
The Admin role should be given to at least one of the synchronized users so they can gain access to the Admin Access.
To grant a user access to Admin Access:
- Navigate to Groups in the User Management section.
- Select a group containing the users who need access to Admin Access. If it has not been created yet, a new group can be made with the list of users.
- Edit the groups permissions by selecting the wrench icon.
- Select the admin role and click
The synchronized admin user should now be able to logout and login to Admin Access. The provisioned (not synchronized) admin user can be deleted.
Configure Archiving and Folder Synchronization
Create a Journaling Endpoint
Journaling is used to push emails from the mailing system (in this case Microsoft 365) directly into the archive.
To create a Journaling endpoint:
-
- Navigate to the Journal Endpoints tab in the Archiving section.
- Select Add journal endpoints.
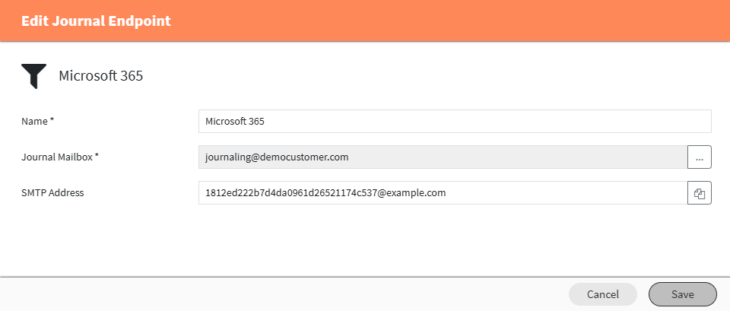
- Enter a name in the Name text field.
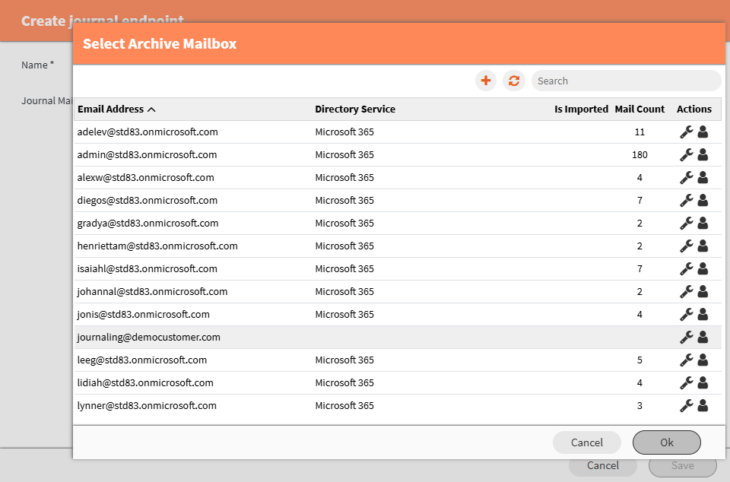
- Select a journaling mailbox. Note: You should create a new mailbox in MailStore cloud that is only used for journaling.
- If not done so already, a new mailbox can be created directly from the Select Mailbox dialog by clicking the +
- The journal endpoint dialog should now look like this:
Select Save. The confirmation will stay open and show a “SMTP address” entry that can be copied. This is used later in the Microsoft 365 configuration to setup email journaling:
- Sign in to the Microsoft 365 Purview portal as an Exchange or Global Administrator for your Microsoft 365 tenant.
- In the left navigation menu select Settings.
- In the now shown Settings submenu select Data Lifecycle Management and then select Exchange (legacy) or use this link.
- From there, click on Journal rules and then New rule.
- In “Send journal reports to” enter the SMTP Address you copied in one of the previous steps.
- Enter a name in the Journal rule name text field.
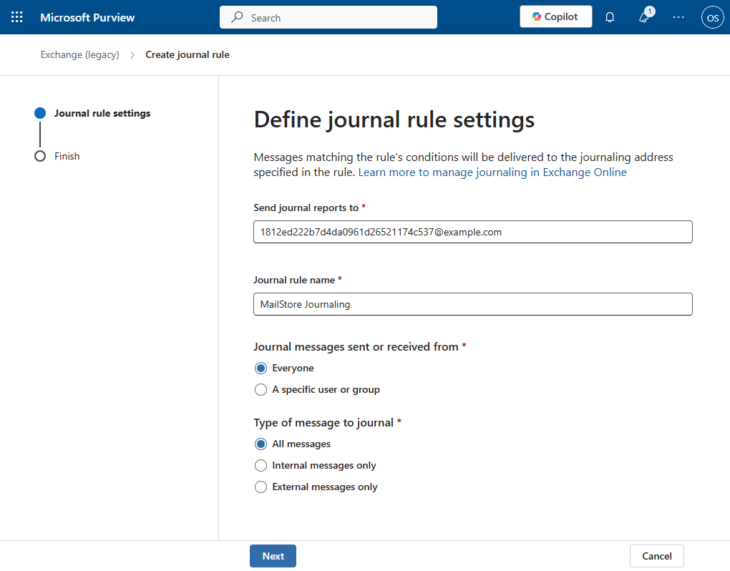
- Select a preference for Journal messages sent or received from.
- Select a preference for Type of message to journal.
- Click Next to review and submit the configuration in the next step.
Emails sent and received from now on should be redirected and archived automatically to MailStore Cloud. To archive already existing emails, you need to configure Mailbox archiving and run it once.
Note: If Non-Delivery Reports (NDRs) containing the X-MS-Exchange-Message-Is-Ndr mail header are sent to a journal endpoint, only the attached mail or journal report will be archived.
Email encryption in Microsoft 365
Microsoft 365 allows to enable email encryption [1]. If encrypted emails are captured by the journal [2], the email attached to the journal report is also encrypted. If this email is archived from the journal mailbox, the encrypted email is in the archive.
To make the unencrypted emails available in the archive when email encryption is activated, it is necessary to instruct Microsoft 365 to also attach a decrypted version of the original email to the journal report. This is described in this article.
If encrypted emails are archived from users’ mailboxes, they are not treated specifically and remain encrypted in the archive.
Create an Archiving Profile
To create an Archiving profile:
- Navigate to Archiving Profiles in the Archiving section.
- Select Add archiving profile.
- Enter a name in the required Name text field.
- Select Microsoft 365 in the Type dropdown menu.
- For the mode, select Multiple mailboxes.
- Select the directory service that was setup in the prior section: Start creating a Directory Service Configuration in MailStore Cloud.
- The Tenant ID is taken over automatically from the selected directory service configuration, and the connection is automatically re-tested.
- Choose the filter appropriate for your use case, e.g. messages of the last ten years, or leave it empty.
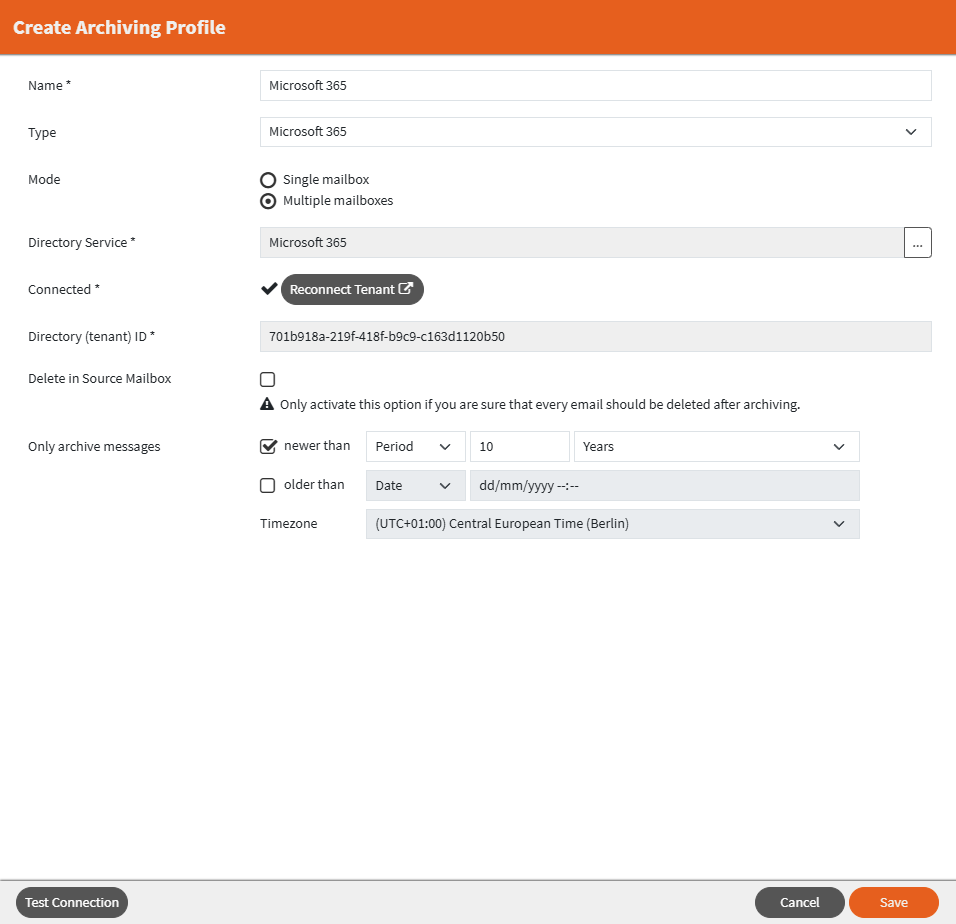
- Click Save.
Create a Schedule to run the Archiving Profile
To create a schedule to run the Archiving Profile:
- In the Archiving profile list, click on the clock icon on the previously created archiving configuration.

- Select the recurrence.
Note: For Journaling, archiving must only be executed once. A schedule with the Once recurrence must always be timed at least 1 minute in the future for it to be executed. - Save the configuration.
The schedule should now be executed at your selected timeframe, a log for the execution can be found in the Process Log tab in the Compliance section.
A schedule can also be created and edited in the Schedules tab under the Archiving section. After the successful completion of the archiving schedule, the schedule and archiving configuration can be deleted.
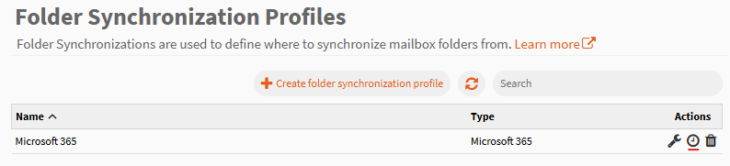
Create a Folder Synchronization Configuration
To create a folder synchronization configuration:
- Navigate to Folder Synchronizations in the Archiving section.
- Click Add folder synchronization.
- Enter a name in the required Name text field.
- Select Microsoft 365 in the Type dropdown menu.
- For Mode, select Multiple Mailboxes.
- Select the directory service from the prior section: Start creating a Directory Service Configuration in MailStore Cloud
- The Tenant ID is taken over from the selected Directory Service Configuration.
- Select an option for Delete in Mailbox. Delete in Mailbox will delete emails from the source mailbox once they have been archived and the foldersync has run successfully. The default setting in the dropdown is Never delete.
- By checking “Synchronize Users”, you can also choose to run a directory service synchronization before the folder synchronization to refresh the users and groups. With that option you do not need a separate schedule for the directory service synchronization. The default for that option is false.
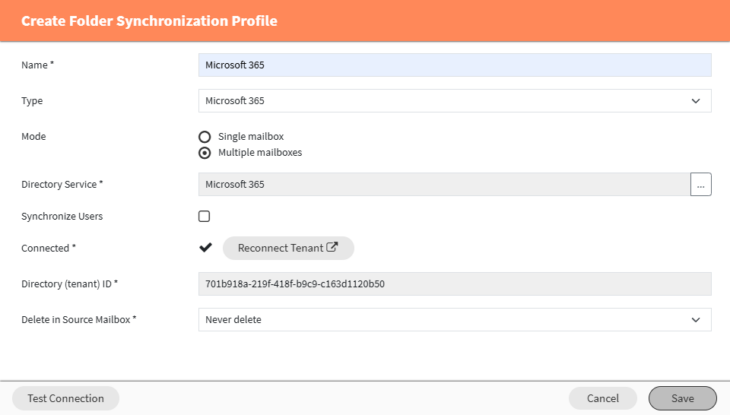
- Click Save.
Create a Schedule to run the Folder Synchronization
- In the Folder Synchronizations list, click on the clock icon on the previously created foldersync configuration.
- Select the recurrence. The folder synchronization should be executed periodically.
- Save the configuration.
The schedule should now be executed at your selected timeframe, you can find a log for the execution in the Process Log tab in the Compliance section.
A schedule can also be created or edited in the Schedules tab in the Archiving section.
Log in to Web Access
You should now be able to log in to Web Access with any of your synchronized users (from your synchronized domain).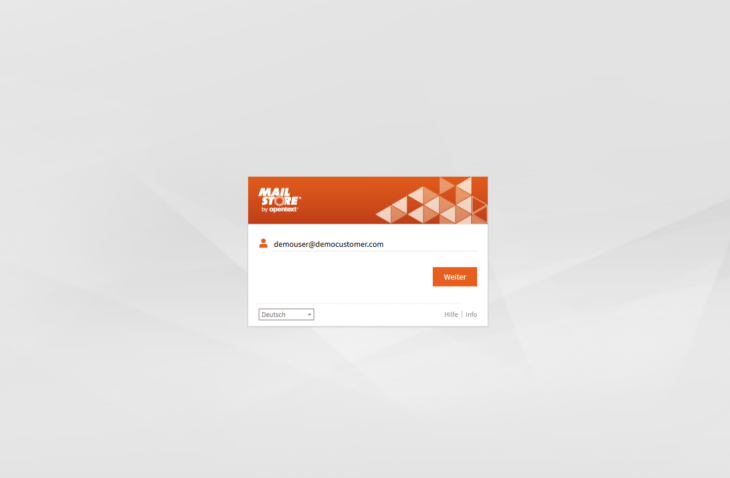
Compliance
You could now continue by setting up compliance rules for your archive.