First Setup: No Directory Synchronization / IMAP Mailbox
Introduction
This implementation guide covers the first setup of MailStore Cloud for customers that do not use a directory service and want to create their configurations manually. Therefore, this guide is mainly applicable for customers with few users that want to archive mails from an IMAP mail server. The guide includes many links to help pages that provide more detailed information about various topics.
It is assumed that you received your registration information including username, password and the login URL via mail. If you did not receive this information, please contact the MailStore support.
Login
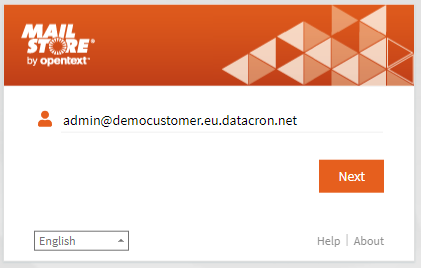
As a first step, please use the credentials that were provided to you to login to the administrative web access (short “Admin Access”). Please make sure that the URL ends on “/adminaccess”. You will notice that your username looks like a mail address, consisting of a name and a domain. The domain is used to identify you as a customer within MailStore Cloud. It cannot be used outside of MailStore Cloud, i.e. you cannot send mails to it or use the domain in your browser. In the screenshot below, you can see the username for a customer with customer name “democustomer”.
Admin Access at a Glance
After you have successfully logged in, you will see the dashboard of the Admin Access. It presents you with basic information about your tenant and points out inconsistencies in your configuration. You should check the dashboard from time to time to make sure everything is working smoothly.
The main menu of the Admin Access on the left provides access to both configurations and the process log. During this first setup, only a few of the sections of the Admin Access will be needed.
![]() MailStore Cloud also offers a Wizard for this setup.
MailStore Cloud also offers a Wizard for this setup.
Adding Groups and Users
It is advisable to use your administrator user only for administrative tasks and have a separate user to access your mails. In order to do so, you will first need to create a user, then create a group and add the user to the group.
Adding a User
- Choose “Users” from the main menu. You will see that there is already a user which is the user you are currently logged in with. It was automatically created during the provisioning of your tenant.
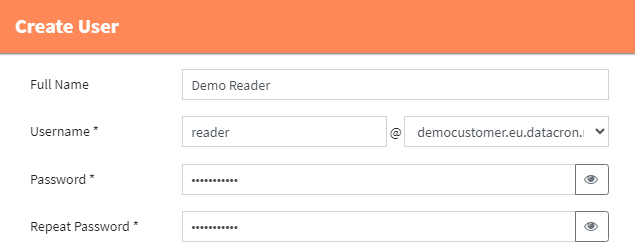
- Choose “Add user” to create a new user. You can choose a “Full Name”, which could be the first and last name of the person the user belongs to. You must choose a username, which will be used for the login. You must also choose a password. The only existing domain is already selected.
Adding a Group
- Choose “Groups” from the main menu. You will see that there is already a group “Admins” which was created during the provisioning of your tenant. The admin user you are currently logged in with is a member of that group.
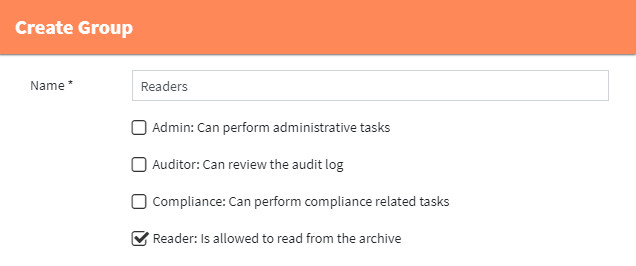
- Choose “Add new group” to create a new group. Choose an appropriate name for the group, in this case “Readers”. Also select the role of “Reader”. Then click “Save”.
Add User to Group
In MailStore Cloud, roles define what a user is allowed to do within a tenant. Roles are assigned to groups and a user has all the roles of all groups they belong to. To have a user with the role “Reader”, you must add a user to the group you just created.
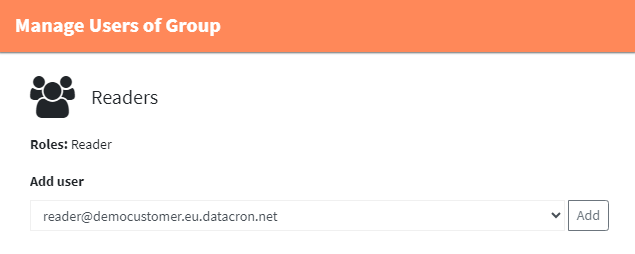
- In the list of groups, click the “Users” icon for the “Readers” group.

- In the following dialog, choose the Reader user from the drop down and click “Add”. You can then close the dialog.
Configuring Archiving
Adding Archive Mailboxes
In MailStore Cloud, archive mailboxes represent the most top-level organizational unit for mails. Every mail that is archived must be in at least one archive mailbox. With each archive mailbox there are one or more mail addresses associated. All mails that are sent to or from these mail addresses will be connected to the respective archive mailbox during archiving.
- Choose “Archive Mailboxes” from the main menu.
- Click “Create archive mailbox”. You have to provide one primary mail address and optionally more secondary mail addresses. An archive mailbox will be represented by its primary mail address in the user interface throughout MailStore Cloud. Assuming you want to archive mails for the address “[email protected]” you would choose that as primary mail address. If there are aliases to that address, like [email protected], those could be used as secondary mail addresses.
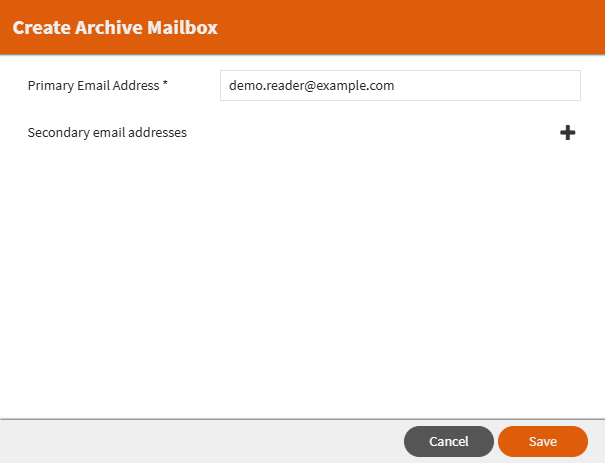
- After clicking “Save”, the newly created archive mailbox will be listed in the list view.
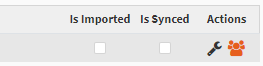
- While having the role of “Reader” grants users the general right to read mails, in order for a user to be able to read mails contained in an archive mailbox, they have to be granted access to that archive mailbox explicitly. In order to do so, click on the “Users” icon in the archive mailboxes list view.
- You can either grant groups or single users access to archive mailboxes. For now, choose the Reader user and click “Add”.

Adding an Archiving Profile
Archiving profiles define the source of mails to be archived, i.e. the configuration of mail servers to archive from. Depending on the type of mail server you want to archive from, different settings need to be configured.
- Choose “Archiving Profiles” from the main menu.
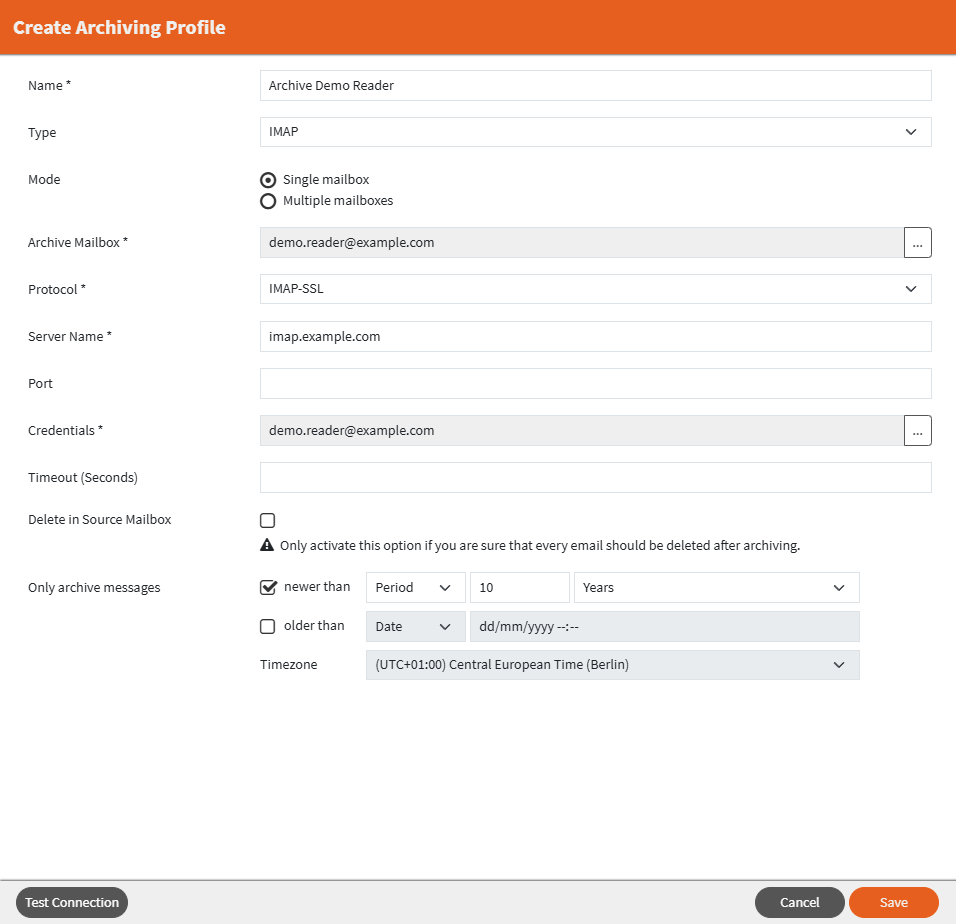
- Click “Add new archiving profile” and fill out the settings.
- Name: Archiving profiles have a name that is used to represent them in the user interface. It can be anything that helps you identify an archiving profile.
- Type: The type specifies which kind of mail server you want to archive from, for this implementation guide we will assume that this is an IMAP server.
- Mode: We will also assume that you want to archive a single mailbox and do not want to use impersonation to archive multiple mailboxes at once. Hence, the mode should be kept as “Single Mailbox”.
- Archive Mailbox: The field “Archive Mailbox” identifies the target archive mailbox within MailStore Cloud. It is the archive mailbox where all mails will reside in by default. Clicking the ellipsis button will open a list of archive mailboxes, where you can select the archive mailbox that you created previously.
- Protocol: Select the correct protocol for your IMAP server. MailStore Cloud only supports encrypted protocols, and the IMAP server must present a valid certificate.
- Server Name: The host name of your IMAP server. A port can be defined in a separate input.
- Port: The port your IMAP server uses. If your IMAP server uses standard ports, you can leave those fields empty.
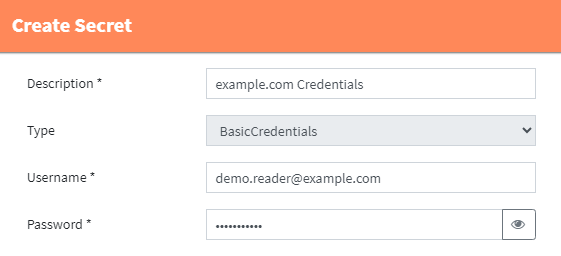
- Credentials: The credentials are the username and password used to connect to your IMAP server. Click the ellipsis button to open the secret selection dialog. As the secret does not exist yet, click the “+” button to create a new one. As you opened the dialog from an IMAP configuration, the correct secret type is already selected and cannot be changed. Provide a name for the secret and fill in username and password.
After clicking “Save”, select the newly created secret from the list and click “OK”. - Timeout: The timeout MailStore Cloud should wait until a connection attempt fails. Leave empty for a default timeout.
- Delete in Source Mailbox: This option is only useful when archiving from journal mailboxes and thus should not be used here.
- Only archive Messages: Choose the filter appropiate for your business case, e.g. messages of the last ten years, or leave it empty.
- The final archiving configuration should look like this:
- When all mandatory properties are filled you can click on the Test Connection button to test the given configuration. A new dialog will open and show the result of the connection test.
- Click “Save” to save the archiving profile.
Adding a Schedule for Archiving
While the archiving profile defines what to do, a schedule is needed to define when to it. An archiving profile without a schedule will never be executed. In case you have defined an archiving profile but no schedule, the dashboard will prompt you to create one.
- Choose “Schedules” from the main menu.
- Click “Add schedule” and fill out the settings.
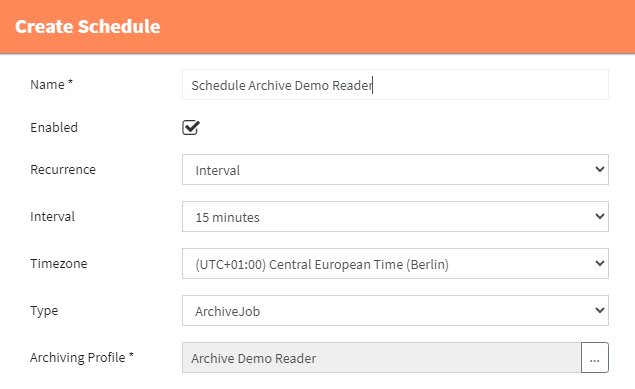
- Name: Schedules have a name that is used to represent them in the user interface. It can be anything that helps you identify a schedule.
- Enabled: Schedules can be enabled or disabled, indicating whether they should be triggered according to their schedule or not.
- Recurrence: Schedules can be created with different ways of defining when they shall be triggered. During this implementation guide, choose “Interval”.
- Interval: The interval the schedule will be triggered in.
- Timezone: For recurrences that use a time of day, the time zone can be defined.
- Type: The type of action to be triggered. In this case you want to trigger an ArchiveJob
- Archiving Profile: The archiving profile to trigger with this schedule. Clicking the ellipsis button will show a list of archiving profiles. Select the archiving profile you just created and click “Ok”.
- The final schedule should look like this:
- Click “Save” to save the schedule.
- Within the next 15 minutes the archiving will be run.
Check Process Log
MailStore Cloud shows logs for processes that were triggered by a schedule. Once a process was triggered, it is listed with a start date and time. The finished date and time will be filled in, once the main process has finished. Subsidiary processes may still be running at this point.
- Choose “Process Log” from the main menu.
- Wait for the scheduled archiving process to show up in the list. You can use the refresh button to check for updates.
- Once the archiving process is started, it will be shown in the list and messages generated by it can be viewed by clicking the details icon in the list view.
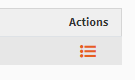
- Depending on the amount of mail being archived, the process may run for a longer time. Wait for the finished time to be set.
- The “Details” view will contain a message telling you how many messages were archived. It will also show the how many were filtered:
Configuring Folder Synchronization
Adding a Folder Synchronization Configuration
In MailStore Cloud, the archiving process will all mails from a given source but neither retrieve the folder structure nor place mails in folders in the archive. For this, there is a separate folder synchronization process.
- Choose “Folder Synchronizations” from the main menu.
- Click “Add new folder synchronization” and fill out the settings.
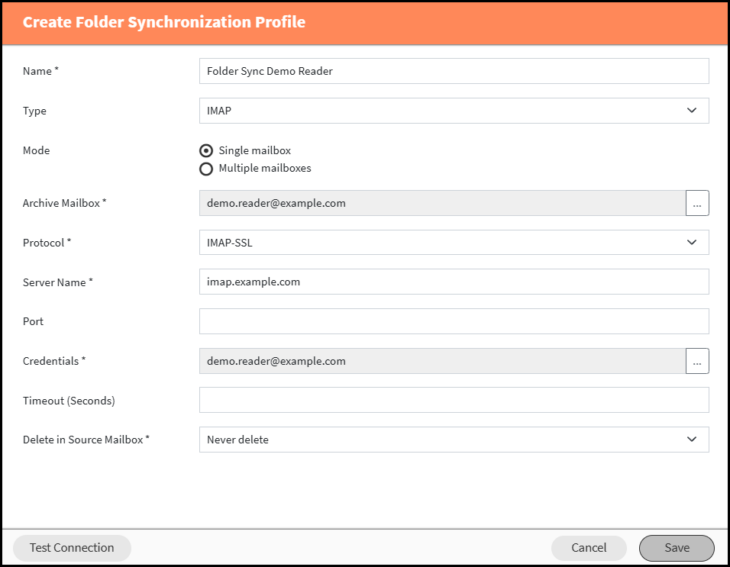
- The settings should be according to the ones you chose for the archiving profile.
- Choose the same archive mailbox.
- You can reuse the credentials you created for the archiving profile.
- Keep”Delete in Source Mailbox” or “Never delete” for this implementation guide.
- The final folder synchronization configuration should look like this:
- When all mandatory properties are filled you can click on the Test Connection button to test the given configuration. A new dialog will open and show the result of the connection test.
- Click “Save” to save the folder synchronization profile.
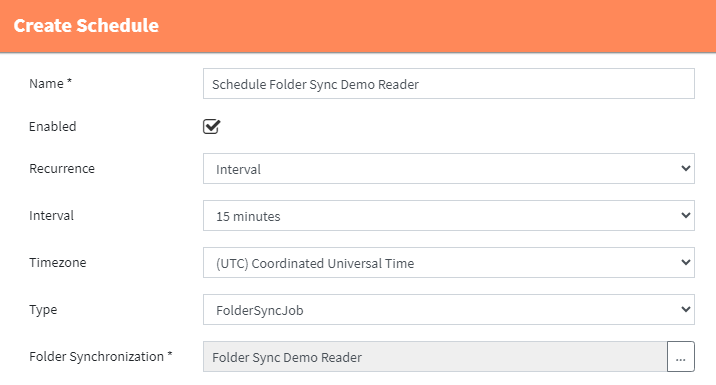
Adding a Schedule for Folder Synchronization
As for the archiving, the folder synchronization must be scheduled.
- Choose “Schedules” from the main menu.
- Click “Add schedule” and fill out the settings.
- This time, choose “FolderSyncJob” as type.
- Select the folder synchronization configuration you just created.
- The final schedule configuration should look like this:
Check Process Log
The folder synchronization process will also show up in the process log.
- Choose “Process Log” from the main menu.
- Wait for the scheduled folder synchronization process to show up in the list. You can use the refresh button to check for updates.
- Once the folder synchronization process is started, it will be shown in the list and messages generated by it can be viewed by clicking the details icon in the list view.
- Depending on the amount of mail and folders being synchronized, the process may run for a longer time. Wait for the finished time to be set.
- The “Details” view will contain a message telling you how many folders were created and how many messages were assigned to folders.
Login to Web Access
You can now use the Reader user to login to the Web Access.
- Login with the Reader user

- You will see the archived mailbox with the synchronized folders.
Compliance
You could now continue by setting up compliance rules for your archive.