First Setup: Customer with Google Workspace
Introduction
This implementation guide covers the first setup of MailStore Cloud for customers that are using Google Workspace as their directory service and mail system. The guide includes many links to help pages that provide more detailed information about various topics.
It is assumed that you received your registration information including username, password and the login URL via mail. If you did not receive this information, please contact the MailStore support.
Login
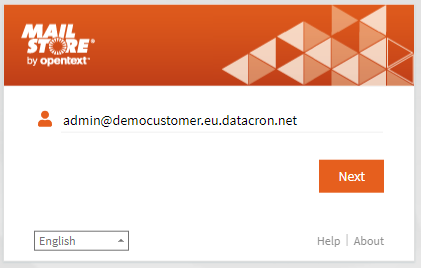
As a first step, please use the credentials that were provided to you to login to the administrative web access (short “Admin Access”). Please make sure that the URL ends on “/adminaccess”. You will notice that your username looks like a mail address, consisting of a name and a domain. The domain is used to identify you as a customer within MailStore Cloud. It cannot be used outside of MailStore Cloud, i.e. you cannot send mails to it or use the domain in your browser. In the screenshot below, you can see the username for a customer with customer name “democustomer”.
Admin Access at a Glance
After you have successfully logged in, you will see the dashboard of the Admin Access. It presents you with basic information about your tenant and points out inconsistencies in your configuration. You should check the dashboard from time to time to make sure everything is working smoothly.
The main menu of the Admin Access on the left provides access to both configurations and the process log. During this first setup, only a few of the sections of the Admin Access will be needed.
Configure MailStore Cloud in Google Workspace
Register a project with Google
To register a project with Google:
- Navigate to the Google Cloud Platform Console.
- If prompted, login using a Google account of your Google Workspace organization.
Note: Logging in with a user that has admin privileges is highly recommended. - If no project exists, click Create Project on the dashboard. Otherwise, open the project list by clicking on the project drop-down in the header and click New project.
- Type in a meaningful name into the Project name field, e.g. MailStore Cloud.
- Verify that Organization matches the desired organization and adjust the Location if needed.
- Click Create.
Once the project has been created, make sure that it is selected in the project drop-down list before proceeding.
Add API Libraries
- Open the Navigation menu (☰) and select APIs & Services.
- Click Library.
- In the API Library, search and enable the following APIs and services:
- Admin SDK API
- Gmail API
Customize Consent Screen
- Open the Navigation menu (☰) and select APIs & Services > OAuth consent screen.
- Under User Type select Internal.
- Click Create.
- Enter a meaningful name into the App name field, e.g. MailStore Cloud.
- Fill out the other fields according to the policies of your organization.
- Click Save and Continue.
- In the next steps, directly click Save and Continue again as MailStore Cloud does not need users to authorize any scopes.
Create Service Account
A service account is required for MailStore Cloud to authenticate with Google and request authorization to use certain Google APIs for synchronizing users and accessing mailboxes. Follow these steps to create the service account:
-
- Open the Navigation menu (☰) and select APIs & Services > Credentials.
- Click + Create Credentials and select Service account from the drop-down menu.
- On the Create service account page, enter a name for the service account, e.g. MailStore Cloud Service.
- You can leave the service account ID at default settings or customize it.
- Enter a description such as:
Service account for MailStore Cloud to synchronize users and access mailboxes.
- Click Create and Continue.
- The service account does not require permissions on project level, therefore do not select a role. Also, users do not need access to the service account, so no changes are needed in the step “Grant users access to this service account”.
- Click Done.
- In the list of service accounts that is now displayed, click the newly created service account to open its properties.
- Under Keys click Add Key and select Create new key.
- Select JSON as key type and click Create.
- The JSON file will be downloaded automatically. Save the JSON file in a secure location as it allows access to cloud resources of your organization.
- Click Close.
- Back under Details, click Show Advanced Settings.
- In the Domain-wide Delegation section, copy the Client ID to the clipboard.
- Open the Google Workspace Admin Console by and log in with your Google Workspace domain admin credentials.
- Open the Navigation menu (☰) and select Security > Access and data control > API controls.
- Under Domain wide delegation, click Manage domain wide delegation.
- On the Domain-wide delegation page, click Add new.
- Copy the Client ID of the OAuth 2.0 Client that is linked with the service account from the clipboard.
- Under OAuth Scope, add the following scopes
- https://mail.google.com/
- https://www.googleapis.com/auth/admin.directory.group.readonly
- https://www.googleapis.com/auth/admin.directory.user.readonly
- https://www.googleapis.com/auth/admin.directory.domain.readonly
- Click Authorize.
Create OAuth 2.0 Client for User Authentication
To allow users to log in to MailStore Cloud by authenticating with Google using the OpenID Connect mechanism, another OAuth 2.0 client must be created as described below:
- Go to the Google Cloud Platform Console.
- Open the Navigation menu (☰) and select APIs & Services > Credentials.
- Click + Create Credentials and select OAuth client ID from the drop-down menu.
- Select Web application as Application type.
- Enter a Name, e.g. MailStore Cloud OpenID Connect.
- Under Authorized redirect URIs, click + Add URI.
- Enter the URI that is reachable by MailStore Cloud:
- Open Admin Access.
- Navigate to DirectoryServices → Create directory service.
- Select the Type as Google Workspace.
- Click the copy icon for OpenID Redirect URI.
- Use this URI in the Google OAuth Client Configuration.
- Click Create.
- Copy the client ID and client secret from the Your Client ID and Your Client Secret fields to a safe place (e.g. password safe or similar) and click OK.
Configure Directory Synchronization
Create a Google Workspace Secret
To create a Google Workspace Secret:
- Open MailStore Cloud’s Admin Access.
- Navigate to Secrets >Create Secret.
- For the Type, select Google Workspace.
- Click on Import Private Key (JSON) to automatically populate fields from JSON file.
- Select the JSON file downloaded in the prior step “Create Service Account”.
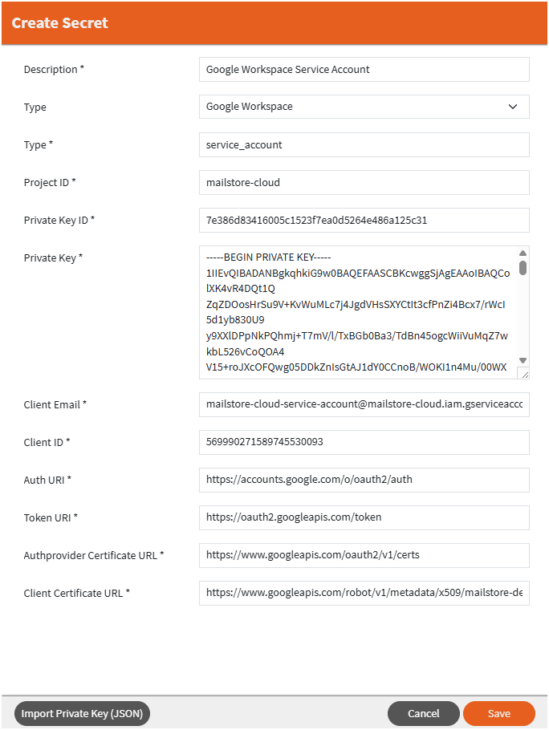
- Click Save.
Create an OpenID Connect Secret
- Navigate to Secrets >Create Secret.
- For the Type, select OpenID Connect.
- Enter the values saved during the prior step “Create OAuth 2.0 Client for User Authentication”
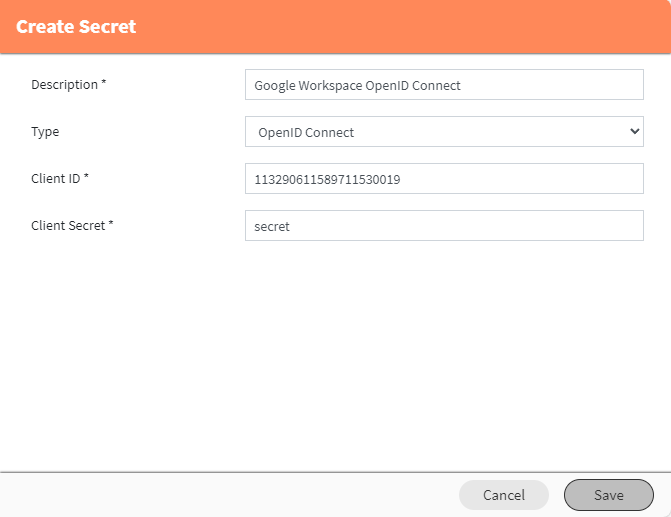
- Click Save.
Create a Directory Service Configuration
- Open the Admin Access.
- Navigate to Directory Services > Create directory service.
- For the Type, select Google Workspace.
- Enter a name in the Name text field.
- As Username, enter the email address of the service account registered in the Google Workspace app registration.
- Enter the values that were used and created in the previous steps.
- Leave the checkbox “Create archiving and folder synchronization configuration” checked.
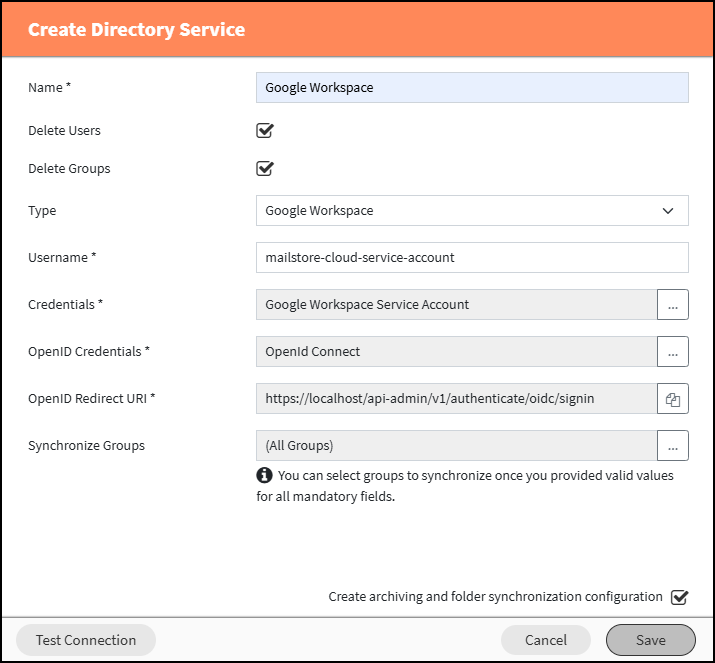
- When all mandatory properties are filled you can click on the Test Connection button to test the given configuration. A new dialog will open and show the result of the connection test.
- Click Save.
Optional: Setup Date Filter for Archiving
You can filter the messages that are being archived by their message date on the archiving configuration that was just created. To do this, please navigate to the archiving configurations list and modify your new configuration. You can find more details about this filter option in the Archiving Profiles help article.
Create a Schedule to run the Directory Service Synchronization
- In Admin Access, navigate to Directory Services.
- Click the clock icon on the configuration created in the previous step.
- Select the recurrence for the schedule.
Note: the directory service synchronization should be executed periodically.
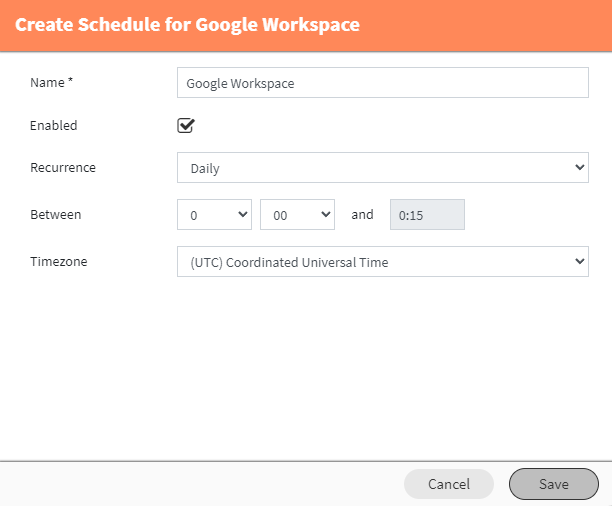
- Click Save.
The schedule should now be executed at the selected timeframe. A log for the execution can be found in the Process Log.
The directory service synchronization will synchronize the following data:
- Domains
- Mailboxes
- Users
- Groups
Configure a group to grant access to Web Access
- In the Admin Access, navigate to Groups.
- Select a synchronized group containing all users that should have access to the Web Access. If one does not exist, create a new Group and add those users.
- Click the wrench icon.
- Select the Reader role.
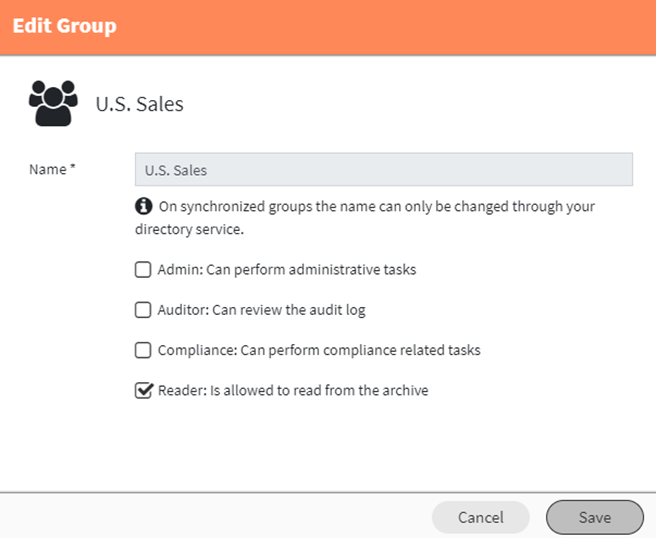
- Click Save.
Adding the “Admin” role to a synchronized user
The Admin role should be given to at least one of the synchronized users so they can gain access to the Admin Access.
- In the Admin Access, navigate to Groups.
- Select a synchronized group containing the users who need access to Admin Access. If one does not exist, create a new group and add those users.
- Click the wrench icon.
- Select the Admin role.
- Click Save.
The synchronized admin user should now be able to logout and login to Admin Access. The provisioned (not synchronized) admin user can then be deleted.
Configure Archiving and Folder Synchronization
Create a Journaling Endpoint in MailStore Cloud
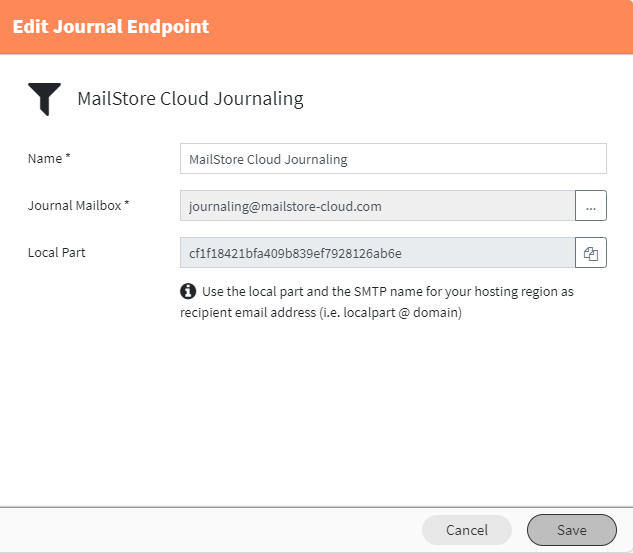
- In the Admin Access, navigate to Journal Endpoints.
- Click Create Journal Endpoint.
- Enter a name in the Name text field.
- Select a journal mail address.
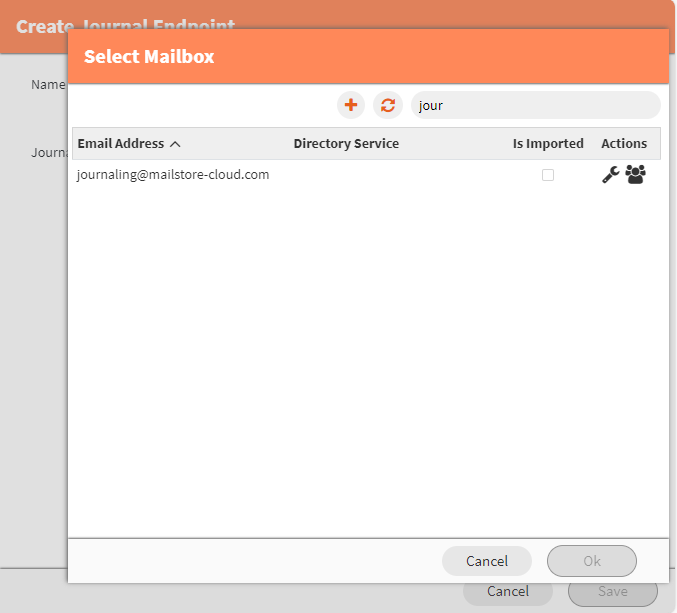
Note: A mailbox only used for journaling can be created by clicking the + - Click Save.
After saving, you can copy the mail address of the journaling endpoint to configure journaling in Google Workspace.
Configure Journaling in Google Workspace
To configuring journaling in Google Workspace:
- Login to your Google Workspace domain as an administrator.
- Navigate to Apps > Google Workspace > Gmail.
- In the Settings for Gmail page, click Advanced settings.
- In the General Settings tab, scroll down to Routing.
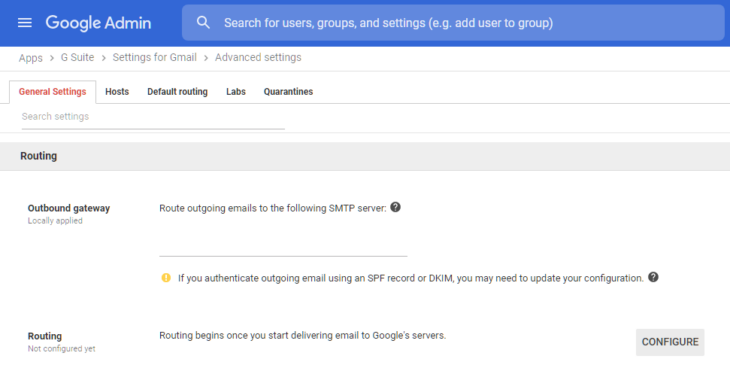
- Click Configure or Add Another to create a new routing rule. A new window will appear.
- Enter a name and enable all checkboxes in the Messages to affect section.
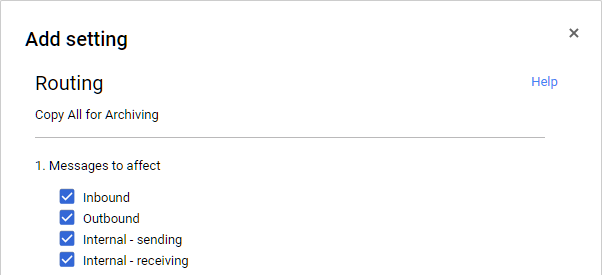
- Under Also deliver to, activate the Add more recipients option and add an additional delivery recipient.
- Select Advanced from the drop-down menu.
- Activate the Change envelope recipient
- In the Replace recipient field, enter the email address created in the previous step.
- Activate the Do not deliver spam to this recipient option if desired.
- Activate the Suppress bounces from this recipient.
- Activate the Add X-Gm-Original-To header option.
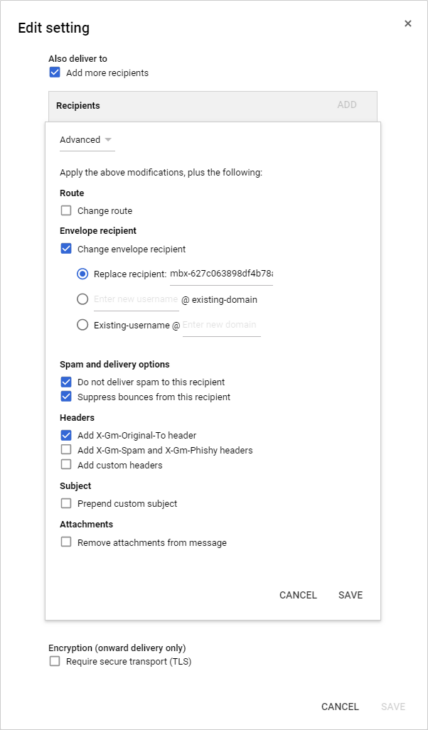
- Click Save further down the window.
- Click Save again on Add setting or Save when modifying an existing rule.
- Lastly, in the footer bar, click Save
Emails sent and received from now on should be redirected and archived automatically to MailStore Cloud. To archive already existing emails, you need to configure Mailbox archiving and run it once.
Create an Archiving Schedule
The Archiving Profile was already created during the previous step “Create a Directory Service Configuration”.
To create an Archiving Schedule:
- In the Admin Access, navigate to Archiving Profiles.
- In the list, click the clock icon on the previously created archiving configuration.
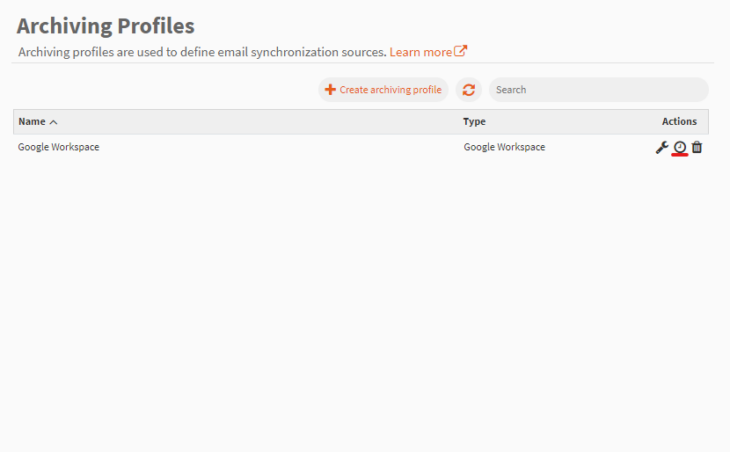
- Select the recurrence.
Note: For Journaling, archiving must only be executed once. A schedule with the Once recurrence must always be timed at least 1 minute in the future for it to be executed.
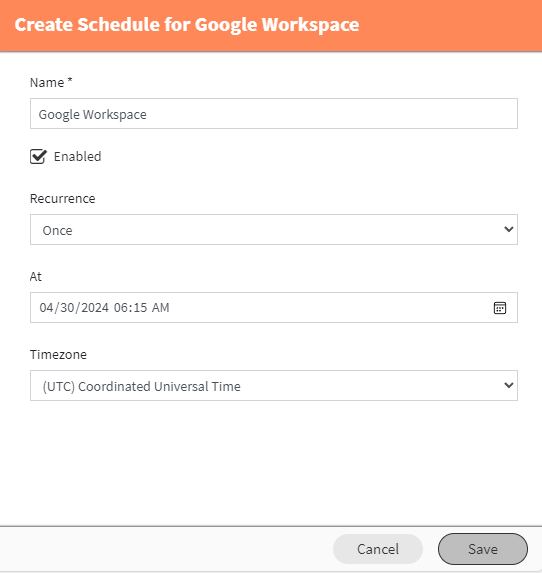
- Click Save.
Create a Schedule to run the Folder Synchronization
The Folder Synchronization was already created during the previous step “Create a Directory Service Configuration”.
To create a Schedule to run the Folder Synchronization:
- In the Admin Access, navigate to Folder Synchronization.
- In the list, click the clock icon on the previously created folder synchronization.
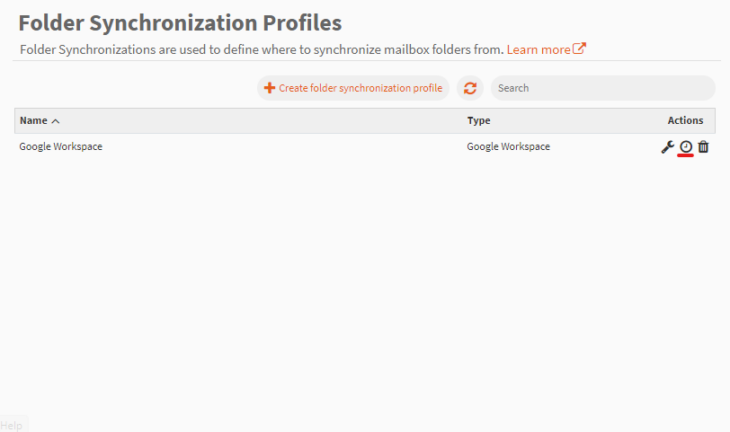
- Select the recurrence. The folder synchronization should be executed periodically.
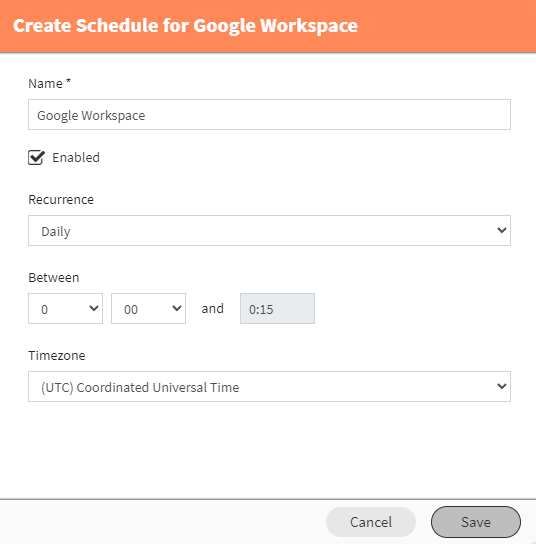
- Click Save.
Log in to Web Access
You should now be able to log in to Web Access with any of your synchronized users from your synchronized domain.
The login should be redirected to the Google login dialog. After successful login it should be redirected again to the Web Access.
The user should see the user’s mailbox with a complete folder structure, all emails already existing in the mailbox. New emails (sent and received) should also be pushed to the archive directly through journaling.
Compliance
You could now continue by setting up compliance rules for your archive.

